

The Injection Moulding Process Step by Step
Stage 1 - Melting
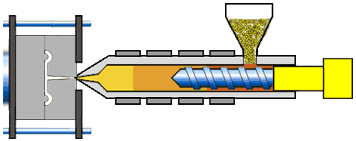
Material granules from the hopper feed into the heated barrel & rotating screw.
Material melted by heat, friction & shear force is forced through a check valve to the front by the rotating screw.
Stage 2 - Injection

Having been moved backwards by the shot of material at the front, the screw is forced forward by a hydraulic ram.
This action injects material into the mould cavity in the closed mould tool.
Stage 3 - Cooling

The tool is held closed under pressure until the plastic material cools & sets hard in the mould tool cavity.
This is often the longest part of the injection moulding process
Stage 4 - Ejection

The screw starts to move back for the next moulding. The tool then opens & the finished plastic part is ejected.
The tool is closed and the injection moulding process starts again at 1.
Injection Moulding Process Video
Watch this video to see the injection moulding process in action: